Have you ever wanted to quickly install Chrome on your Windows Server without the hassle of manual downloads and installation? Well, now you can do it using PowerShell! Here are the steps:
1. Open Powershell
To open powershell, Press the Windows + R keys together to open the Run window.
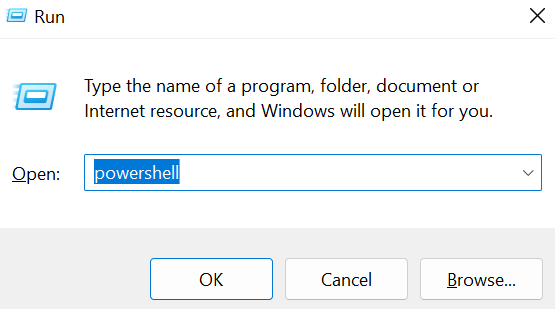
Enter "PowerShell" and then press enter.
2. Paste this code

Once Powershell is open, copy and paste the following code into the window:
$LocalTempDir = $env:TEMP; $ChromeInstaller = "ChromeInstaller.exe"; (new-object System.Net.WebClient).DownloadFile('http://dl.google.com/chrome/install/375.126/chrome_installer.exe', "$LocalTempDir\$ChromeInstaller"); & "$LocalTempDir\$ChromeInstaller" /silent /install; $Process2Monitor = "ChromeInstaller"; Do { $ProcessesFound = Get-Process | ?{$Process2Monitor -contains $_.Name} | Select-Object -ExpandProperty Name; If ($ProcessesFound) { "Still running: $($ProcessesFound -join ', ')" | Write-Host; Start-Sleep -Seconds 2 } else { rm "$LocalTempDir\$ChromeInstaller" -ErrorAction SilentlyContinue -Verbose } } Until (!$ProcessesFound)
3. Press Enter to run the code.
Wait for Installation...
The installation should start automatically and be complete within a few minutes. Once it's done, you will have Chrome installed on your Windows Server!
4. That's it!
Enjoy! Now that you know how to install Chrome quickly and easily using PowerShell, there are no more excuses not to have this great browser on your Windows Server. Enjoy the power of Chrome!
If you encounter any problems during installation, be sure to check out the official troubleshooting guide from Google or contact their technical support team for assistance. Thanks for reading, and happy browsing!
